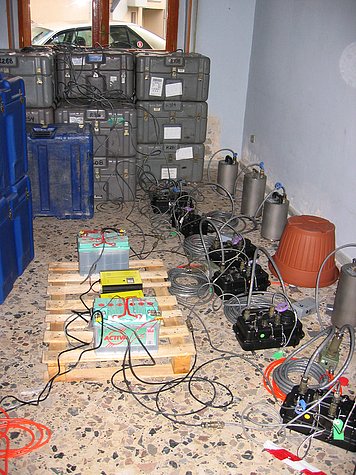
Huddle testing feedback-sensors and dataloggers
Introduction

“Huddle”-testing sensors before field deployment is a key part of any seismic experiment. Huddle-testing involves testing almost all components of the field station, for many stations, in parallel. The number of stations that can be tested at one time is limited only by availability of personnel and lab space.
Huddle-testing potentially reduces crew time spent in the field, cost of the experiment and the need to revisit sites. Huddle-testing improves crew consistency and most importantly, the likelihood of successful station deployments and survival.
Huddle-testing usually requires setting up a subset of station equipment (e.g., sensor, DAS, GPS and power), powering the station and allowing it to collect data overnight, viewing the recorded data for anomalies, and packing the equipment ready for deployment. Generally, there is no need to set up solar panels or frames, station boxes, etc, though crews should be very familiar with the assembly of solar panel mounts and placement of equipment within the station box.
When huddle-testing nears completion, all field crews should participate in the installation of the first station to ensure consistency of installation procedures between crews.
Purpose of huddle-testing
Huddle-testing serves several goals:
- Stock-take PIC-shipped items
- Stock-take PI-supplied materials
- A visual inspection identifies station components damaged during transit
- Verifies system integration of component parts
- Provides additional training before crews head into the field
- Ensures practice using the PIC Install Sheet
- Allows triage of marginally-performing station components
- Allows reset of the GPS constellation database
- Provides the opportunity to charge all batteries before deployment
Requirements
Huddle-testing can be conducted anywhere that has a reasonably level floor with a compacted surface, preferably a ground floor if in a building. Given that the testing is most-often conducted overnight when cultural noise is at a minimum, a secure space of sufficient area, protection from weather and direct sunlight, access to good skyview or window (for GPS), and a space that provides easy access to the transit cases is recommended.
Set-up
Construct the station: As each component is removed from the transit case, check that the item has no visible damage. As the station components are laid out, special attention should be made to ensure that the sensor cannot be accidentally knocked as people move through the space. E.g., if a table is available, the sensor can be placed under the table with the recording equipment on top of the table. If space allows, keep the transit cases close to the station equipment being tested. Allow sufficient space between stations for safe personnel movement.
There will be a lot of cabling, so good cable management can be practiced and refined at this stage.
Orient and level the sensor: All the sensors being huddle-tested should be oriented in the same direction, with no requirement that they all face True North. This enables subsequent analysis by visual correlation of waveforms recorded by adjacent sensors.
GPS: Lay out the GPS antenna and cable. If indoors, and unless the roof is radio-transparent, the antennae will have to be placed to receive the satellite signals, e.g., on a window sill or cabled through to outside the building. The GPS was probably last-locked in Socorro, NM, and could take a considerable time to lock onto the current satellite constellation. Once locked, subsequent locks during field deployment will be relatively rapid.
Apply power: Connect all subsystems, check value and polarity of power subsystems, then power up the station. With the Clie or equivalent, check that the programming of the Q330 (if being used) is for the current experiment. Then apply power to the sensor and unlock it.
Follow the PASSCAL-approved installation sheets!
Allow the huddle-test to run overnight. The following morning, upload the data to a laptop and examine the state-of-health (SOH) and waveform data (See Analysis section). If the go/no-go state of a station component is undecided, leave the station running additional nights.
If SOH indicate a healthy DAS and associated subsystems, and the sensor records data similar to others in the huddle-test, lock the sensor, power down the station and carefully pack all equipment in their transit cases. The station is now ready for transport to the field.
All components that fail should be red-tagged with a description of the problem and not used in the experiment unless the PIC or PI suggests that is OK to do so. The PIC should be notified of the problem and the component’s serial number
If a component is suspect, replace it and consider installing the marginal component at a “marginal” site. E.g., a noisy sensor could be marked for installation in an urban or naturally noisy site.
Analysis
Use PASSCAL-recommended techniques to offload the overnight data from the DAS, convert to miniSEED, and use the graphics tool pql to view the waveforms.
Key features in the data to check are:
- Look at SOH data (timing, power/current draw, etc)
- Look for timing errors between stations
- Look for dead/reversed-polarity/noisy channels
- Look for pinging (on Galperin sensor designs, the pings will be resolved on all 3 components)
- Look at the same waveform channels for different sensors in several frequency bands but focus on the micro-seismic band (0.1-0.5Hz) where amplitudes and waveform character should be similar across sensors,. Other filters include teleseismic events (0.03-0.08Hz) and high-freq cultural/local events (1-6Hz).
- If an earthquake event is recorded, check that waveform amplitudes correlate and have the same amplitude
- Look for rapid drifting of mass-positions
| Attachment | Date | Size |
|---|---|---|
| 08/28/12 3:53 pm | 67.73 KB |
- Home
- General Information
- Instrumentation
- Dataloggers
- Sensors
- All-In-One Systems
- Power Systems
- Field Procedures
- Controlled Sources
- Seismic Source Facility
- Magnetotelluric Systems at PASSCAL
- Ground Penetrating Radar
- Power and Memory Calculations Form
- Data Archiving
- Apply for a PI Account
- Experiment Scheduling
- Polar
- Important Hardware/Software Notes
- USArray
- Software


