Broadband Vault Construction

Download Diagram of Vault (jpg)
Construction of the vault for broadband seismometers has a direct impact on data quality. Before construction can begin there are two other important considerations as well; location, and setting. A short discussion of these topics precedes the construction details because you should really pick the right site before going to all the work of building a vault. It takes a long time to find good sites which balance the competing requirements of low noise, access, security, position within the array, power, permission, etc. Finding one site per day is fairly productive.
Location:
The area within a few kilometers of the chosen site should not have hydroelectric turbines (10km), frequent train lines (3km), irrigation pumping stations (2km), and other large machinery (1-2km). Quarries are less of a concern as they shoot a few times per day. Close proximity to heavy earth moving equipment however is noisy all the time. Basically, big moving things are a problem especially when they are active for large portions of the day and irregular. Some very regular ground motion as induced by turbines and diesel generators are so monotonic that they are easily filtered from the seismogram. If they have
spectral components in the band of a few Hertz this is still a strong contaminate.
Setting:
The site should be located on bedrock if at all possible. Not bedrock within 10-20 meters of the surface, ON bedrock outcrops. Preferably in a place where you dig down 1.5 meters to the outcrop and it's kind of level. The principle reason is that bedrock pads are less susceptible to tilting caused by pressure, temperature and local disturbances. No river bottoms, or arroyos. Avoid placing the station near trees, power poles-things that sway in the wind. As a rule, you should be at least as far away as the thing is high. Check the drainage. Most sites have to be moved for one of two reasons; flooding or vandalism. How's the security? A vault should be designed to prevent casual entry by kids or curiosity seekers. Real thievery is prevented by a watchperson and building a very discreet site. Private landowners are much easier to make arrangements with and the site will generally be more secure. Is access possible throughout the seasons you intend to operate? The solar panels can be visible as a shiny object from a long way off to the south. If they are on a tin roof, mostly horizontal, or south of the main road they will not attract as much attention. It should be needless to say but, you cannot hide the panels behind, in, or under trees and expect them to produce much power.
Construction:
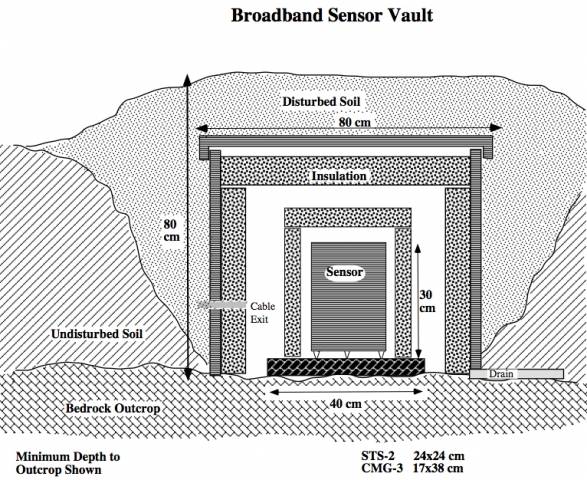
The principle of this design for broadband sensor vaults is to minimize temperature changes, and to distance the sensor pad from the surficial layer which tilts due to temperature, precipitation, solar insolation, wind, etc. Nearby sources of ground noise, like footsteps and acoustic noise, are also reduced by shallow burial. The idea has been implemented in a wide variety of soil types and terrain. The actual construction must be adapted to the site and materials available. Determine if any of your planned materials are especially prized by the locals and substitute something else if you can. You must also balance the level of effort required for construction versus the length of deployment, and quality of data. Most stations built from scratch take about 1-2 days to build and a few hours to install all the equipment. Finding a pre-existing enclosure is a tremendous savings in time and effort. These might include basements of private homes, power-substations, abandoned mines, caves, or root cellars. Consider the details of wiring up the power and clocks however.
In addition to providing the best seismic environment for the sensor, the vault must defend the sensor from two major hazards, flooding and vandalism. Some thought on how to mitigate these hazards should be incorporated into the specific design of the vault based on the risk in the operating region.
Flooding:
Very few sites flood because the water table rises. If so, the vault must be airtight to survive and this is very difficult to achieve. Alternatively the sensor must be enclosed in a submersible pressure case and the remaining station equipment installed above grade. If possible find another site. Flooding as a result of precipitation is caused by insufficient drainage, usually abetted by ill-fitting vault covers. Attempts to make a sealed cavity (from concrete, barrels, bricks, plastic, etc.) fail because somewhere it leaks, maybe only a little, but once inside the water has nowhere to go. Most of the time, most of the sealed cavities work fine. But when they fail the equipment is often ruined. What makes the sealed cavity complicated is that the vault must have a removable lid and allow a cable to exit. A better design is to divert water from the top of the vault (extending a cover perhaps over a large area on the surface) and allowing the vault itself to drain should it collect any water. It's a flow problem, not a sealing problem. Some soil conditions still make it difficult to drain water, an automatic sump pump is one solution (12VDC models are about $40). You'll be able to tell how often it runs.
Another technique known as a diving bell (or wet bell) has been used to advantage in wet climates. First proposed for PASSCAL sensor vaults by Patrick Shore of Washington University, it is now being used by a number of PASSCAL PI's. The idea is to have the sensor sitting in an airtight chamber, open at the bottom. Should the dug vault cavity flood, the pressure of the water keeps the air trapped inside the chamber and the sensor stays dry. Keys to success are: no airleaks in the bucket over the sensor, approximately 6 inch height of the top of the sensor pad above the base of the inverted bucket, sufficient weight on top of the bucket to anchor it.
Security:
The sensor vault should be locked. The service team should have a key, because leaving the keys with the onsite attendant can waste a good deal of time looking for the alleged attendant. You are best off getting locks in the US that are keyed alike. The exact locking scheme depends on the vault materials. If the vault is poured concrete, then some loops of rebar can be exposed at a convenient location to lock the lid directly. It is easier to string a chain through the loops and lock the lid down to the chain. Wooden vaults can be secured with hasps attached to the sides. Barrels can be locked with a locking ring or by drilling a hole in the rim and forcing the lock around the rim. Barrels tend to leak from the lid especially if you have locks in the rim. Special plastic lid covers are available which can alleviate some of the problem.
Once the sensor is installed in the vault, the vault should be covered with as much as a foot of soil. With the addition of some bushes (reducing the solar insolation), the sensor vault can become rather well camouflaged. This and the work it takes to dig it up, and spring the locks is a strong deterrent to the idly curious.
Hiring a watchperson is effective. In the US or areas where private property is respected, this may be no more than asking the landowner to keep an eye on the station as part of the negotiations in securing permission to use the site. $50 per year is a typical rental charge for small permanent stations. In foreign places where theft is routine, so is the occupation of watchperson. Rates are usually reasonable, around $10 / month for (more or less) 24 hour surveillance. As a bonus for the successful conclusion of any project, the station batteries are often given to the watchperson or landowner. In most areas this is a strong incentive.
A cautionary note about negotiating for permission and the hiring of guards. The security of the site can be worsened if the wrong village or overseer is contracted when in fact governance of the site is the right of another village or person. Similarly, making the competition too fierce between villages or watchpersons for hosting the site can spawn unnecessary trouble. If the village does not seem to endorse the station's presence you may be better off leaving town quietly.
Part of the site agreement should encourage the host to contact someone for the immediate removal (within 3-6 weeks) of the site if it is no longer welcome for any (including no) reason. It is not unusual to be viewed as part of 1) the government, 2) a big mining or oil company, or 3) some foreign group. The best defense is that it is a university project in cooperation with local universities and government agencies for scientific studies, primarily run by students. Having a local scientist or student along to explain this the first few station visits adds credibility.
Label the station with a note in english and the local language describing the purpose of the station and who can be contacted locally for information. We suggest the purpose of "Earthquake Monitoring Equipment" as fairly benign. The local contact indicates clearly that you have permission, and are open to further contact. Preparing a label beforehand, as opposed to a magic marker scrawl, looks better, though you might still have to write in the local contact.
Cable Layout:
The sensor vault should contain only the sensor. Whether the datalogger and other station equipment is below grade in another vault as well, in a small hut nearby, or inside a building is a matter of security and convenience. PASSCAL provides 5-meter cables between the sensor and the breakout box. It is best if the breakout box is situated near the DAS so that it can be checked during a service visit, if necessary. Another cable is provided to go between the breakout box and the DAS. The STS-2 host box must be kept dry as it does not seal well and contains a fair amount of electronics. The guralp box simply routes wires, but is also prone to water damage. The maximum distance between sensor and DAS can be as much as approximately 8 meters, but this would require some enclosure for the breakout box. It is best to shoot for about 3 meters distance between the DAS and sensor (with the breakout box and DAS in the same location). Note that is sensor, not sensor vault. There should be cable enough to pass through access holes, and allow a bit to be secured to the wall to prevent tugs from displacing the sensor. Because the DAS has no moving parts, it is possible then to place the DAS and sensor within a meter without ill-effects. In special cases, long cables can be built to go from the DAS to the breakout box, perhaps as long as 10 meters. If the breakout box cannot be made accessible, a special cable can be built to bring the signals out to a convenient location. PASSCAL can provide cable diagrams should this be necessary.
All cable runs should be buried, even if only a few inches or with rocks piled on them. Exposed cable is degraded rapidly by UV rays and is chewed by rodents. The rodents seem to like only the insulation, nibbling it off along the cable often without breaking many conductors. Unfortunately this leads to shorts, and a steady deterioration of signal quality. Cables are expensive to replace as a routine. Leave any excess cable coiled near the DAS. For the STS-2 sensor cable, keep in mind the host box is attached to one end and the other end has a elbow connector which fits through holes about 1 1/2 inches in diameter. If the construction includes tubing as a way of protecting the cable, include pull wires when the tubing is installed so that the cables can easily be drawn through the tubing when the equipment is ready to be installed.
Digging:
The vault is begun by digging an appropriate size hole that bottoms onto something firm. The target depth is between 80 and 180 cm. Use a rod to pound in and get an idea of the depth before digging. Weathered granite and shales often do not have an abrupt transition from loose to firm but must be chipped at until the layer is deemed firm enough. An iron bar is better than a pick axe for this. At the surface the hole is typically twice as wide as the final vault. Soil walls which are steeper than 45 ring can collapse at a later stage, burying a pad before it's hardened. Despite the extra digging, it is better to make room to work and get everything in nice and neat. Don't fling the excavated dirt way down the hill, it will be used to fill in the hole and cover the sensor. Keep it one hole width away to prevent slumping.
Azimuth:
Depending on the type, it may be easier to pour the sensor pad first or to install the vault shell. In either case, along here somewhere the orientation azimuth should be established. The orientation azimuth for the sensor should be determined prior to finishing the vault because the use of rebar, barrels, and other construction materials alters compass readings and the final enclosure can be cramped and/or difficult to translate a bearing reference into the enclosure. A permanent mark on the sensor pad indicating the alignment azimuth can be made easily when the pad is poured by making a line or emplacing a straightedge into the concrete. Marks with pens, magic markers and sticks disappear in time. One trick is to plant a stick in the ground on each side of the vault to serve as a temporary azimuthal reference while the enclosure is being constructed. Stretch a string between the sticks and translate this azimuth onto the pad when ready.
Sensor Pad:
A form for the sensor pad should be 16 inches diameter, round or square whatever works best, and a height of 2-4 inches. Get the top of the form level, using dirt and rocks to dam around the bottom. Then pour in the concrete up to the top of the form. Try to leave a smooth, level surface. Some people say you should not couple the pad to the vault (shell) walls; we do not think this is critical. Do avoid placing the pad across cracks. The drying time for the pad varies with temperature, humidity, and type of concrete but at least a day is necessary before the sensor can be installed. Rapid deployments might implant a rigid plate (14 inches diameter) in wet cement and wait only half a day. The site will not be free of settling and expansion for probably a week but the recentering of the sensor can accommodate a certain amount of this deformation.
Vault Shell:
The vault shell should be a rigid material and tall enough to extend slightly above grade. The purpose is to keep the soil walls of the hole from collapsing on the sensor and to divert water away from the cavity. Within the shell, insulation is placed around the walls. In some cases the insulation is glued, nailed or stapled to the shell wall. For cramped vaults (barrels) it is easier to allow the insulation to be inserted after the sensor is in place. The natural curl will hold rolled insulation in place against the outside wall of a barrel. A layer of insulation should fit on top of the wall insulation around the shell, make sure it can't sag or slump onto the sensor. If you are arriving at a prebuilt concrete or brick vault with rigid insulation, don't expect the dimensions to be precise or square. Cut the insulation onsite with a hacksaw blade for a custom fit. If there is alot of condensation within the vault, you can avoid drops (and the accompanying seismic signal) by making the lid or insulation sloped from one side to the other.
Inside the layer of shell insulation, an insulated box covers the sensor. In this way two separate thermal cavities are maintained. For the shell insulation and to a lesser degree the sensor insulated box, it is much easier to have a top that goes on after the sides are in place. You are trying to place this stuff around a very carefully positioned, very sensitive (to bumping) device and being able to see how to fit the insulation helps immensely. Once the sides are in place, plopping the top on is easy. The sensor cable exit is normally at the base of both insulation layers and up the shell wall to a hole in the shell wall.
Insulation materials:
Polystyrene foam. Rigid white foam blocks. Can be easily fashioned into cubes and nailed to wood walls. It is bulky to transport, especially when assembled into cubes. Does not absorb water and remains workable in all weather. The preferred insulation.
Polyurethane foam. Squeezable foam (used in the shipping case as padding). Can be rolled into a cylinder and a lid taped on, though better if done around the outside of a plastic bucket. It absorbs water and will then sag. Easy to haul around and can be used as a pillow.
Fiberglass batting. Doesn't absorb water much. Can be rolled into cylinders, nailed or stapled to wood. Not rigid enough for spanning the top or supporting itself but can be wrapped around another rigid material such as a plastic bucket. Nasty stuff to carry around in the car for awhile.
"Great Stuff" spray foam. Gooey foam to fill cracks, holes, pipes. This is like foam glue, it dries to a rigid foam. Seals against water and insects. Mice chew through it if pressed. Excellent for sticking the cable to concrete or holding a plastic bucket down. Best if the entire can is used at once because it will glue the can closed if not halted properly. It is fairly expensive however.
Lid and cable way:
The top lid for the vault should be constructed so as to have a lip which fits over the outside of the sides of the vault shell. This sheds water and prevents the lid from sliding sideways to uncover a portion of the vault. Again, there should be a way to lock the lid in place. Hasps can be attached to the inside of the lip and closed over a staple attached to the shell side. A piece of plastic sheeting over the lid and down the side as a first defense against water is easy. As long as the sensor functions, the vault should not have to be uncovered until the end of the deployment so ease of entry is not a great concern. Buried plastic rarely survives more than one unshoveling episode. Alternatively, a 6x8 foot polyethylene tarp stretched over the vault mound and covered with 2-4 inches of soil is excellent for keeping the vault dry. Larger 10x10 foot tarps have been used successfully in very rainy environs.
Cable ways should be planned such that the normal effort in opening the site for servicing does not expose cables to damage. This is important when the DAS vault is buried. The solar panel wires, external clock cable and sensor cable should exit the DAS vault at a depth or location to be well clear of normal shoveling activity. The sensor cable is usually routed through a pipe to the DAS location, at times just a foot of PVC pipe connecting the adjacent hole. It may be convenient to have the clock and solar panel cables join the sensor cable in this pipe rather than forcing a separate hole into the DAS vault.
Field Notes:
While the site is under construction, take some photos. When finished, carefully sketch the particulars of the site, including layout of DAS vault to sensor vault and expected or actual cable runs. Note the layout relative to north, other nearby buildings or landmarks. Make a note of the geology or soil types, depth of burial, and distance to possible noise sources. It is very common for one group to construct the sites and another crew to install the recording equipment, where perhaps only one or two people are members of both crews. Make careful directions to the specific site from the road or at least name a contact person who can show the installation team the appointed spot. The site plan is also useful when removing a station several months later to know where all the cables are.
